|
|

Missions to help Save the Admiral!
"Trouble Next Door"
A tricky political situation has come up that needs your special care and attention... A nearby warfront for your country has run into trouble, and needs help to pull out of their bad situation.
The powers that be back home have put pressure on central command to have YOU clean up the mess by diverting some of your forces into the troubled region to help out. You have been ordered to send a variety of warships and transports to specific reinforcement zones on the current battle map. Once there, these ships will depart from this battle to help turn the tide in the nearby troubled region.
Command was able to muster up some extra ships to help you out, but the bulk of reinforcements will have to come from your own frontline fighting forces. In other words, you will have fewer ships left home to help win your own battle here on this map...
Sometimes there are enemy patrols in the destination zone areas, so be careful!
The mission button and floating mission menu will describe the exact dollar amount of warships and transports you need to provide to your neighboring troubled region. Buy your choice of warships and transports to move to the reinforcement zones, but take note that some ships are worth more than just their purchase cost if moved to the zones. Specifically, large slow ships such as Carriers, Battleships, and Cruisers usually count for more than their dollar cost once they reach the reinforcement zone. Transports are also usually worth an extra bonus for delivery (compared to Armed Transports).
Because this mission is so important to command central, the normal city conquest Victory Points you take during this mission will be adjusted by how well you provide the needed reinforcements. This adjustment is made to what would otherwise be your normal cumulative VP total for the game.
For instance, if you fail to provide even one extra ship as reinforcements, you will usually be credited only 60% or less of your actual VP total. If you manage to provide about 80% of the needed reinforcements, you will receive credit for 100% of your VP total. Provide the full number of needed reinforcements, and you will be credited 120% or more of your actual VP total.
In other words, failing to provide the needed reinforcements will severely lessen your score for this battle. Provide most or all of the reinforcements and your score for this battle will not suffer. You also have the chance to earn a VP bonus on top of all the cities you actually conquered.
The Real Reward is helping rebuild the Admiral's reputation by pleasing central command and helping out the nearby troubled region. Do a good job and you will earn credits towards your own customized command fleet of special ships and abilities abilities, AND improve the Lost Admiral's political repute back home... eventually helping restore him to full office and sanity.
So complete this mission as best you can to help out the Lost Admiral, and be careful to still win the local fight for cities because command central will not be pleased if you blow either job (i.e. your mission rewards will be lessened if you lose the local battle while getting those reinforcements delivered).
Specific Tips on how to execute the mission start here:
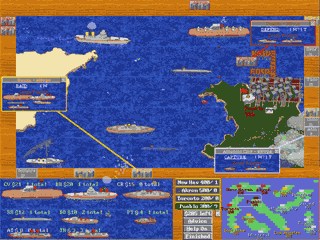
Use the Mini Map to see where various mission zones are located. Zone hexes will be displayed as orange on the Mini Map. Any Zone hex that is in a city harbor hex will be shown as a small orange "box" around the corresponding hex on the Mini Map.
To learn more about various zones, use the movement screen. Scroll the map (or use the Mini Map to quick-jump to the area) and then hold your mouse pointer motionless for a moment over the green dashed area of the zone. After a moment, a "tool tip" with more information will pop up describing this zone.
You can also use this same "tool tip" trick to learn more about mission ships.
Mission ships are displayed as normal ships on the movement screen, with a green flag flying above them. This green flag indicates the special "mission" nature of the ship. Move your mouse over the ship to get a "tool tip" describing what the mission ship is carrying and or where it needs to travel to next as part of the mission.
During "Trouble Next Door", you will need to move warships and transports to the desired reinforcement zones. You can use any of your ships to do this, so there are no "mission ships" created during this particular mission.
When your ship arrives in the reinforcement zone, they will need to survive one round of combat with any enemy ships located there, before "leaving" this battle map at the end of your movement phase, and being counted as successful mission reinforcements.
The troubled nearby region will not accept more warships and transports from you than Central Command has allocated for this mission. So once you have delivered 100% of the needed Warships, no more warships will be removed from the map as mission reinforcements, etc.
As mentioned above, certain ships will count as more than their normal dollar amount when you deliver them to the reinforcement zones. Use this to your advantage to more easily deliver the total value of ships needed. I.E. Moving a Transport to the reinforcement zone will give you $6 total value, which is almost as much as moving an Armed Transport ($8) would give you. Delivering a Cruiser is worth $20, which is equal to two Destroyers ($20).
Note that special small graphics will appear during movement in the hex of any of your ships that are able to interact with the mission. If your ship can do a mission action by ending it's turn in that hex, an icon with a question mark in it will appear to confirm that you are in the right hex. If you are in the right hex, but too late, or your ship is already full, etc, an icon with an "X" in it will appear, along with a popup message explaining more. When you successfully complete part of the mission during movement you will see a small icon with an explanation mark in it (as opposed to at the end of your movement phase + combat phase, which is not seen onscreen).
Questions? Suggestions? Email thurston@fogstone.com with your feedback, questions, and suggestions!
This manual is broken up into sections explaining how to
play the game, how the program menus work, and other details of interest
to players of Lost Admiral Returns.
Please use the menu bar on the left to navigate the manual.
If you have questions, please visit our forum and look for help there.
If you find an error or omission in this manual, please email us at support@fogstone.com
Thank you for trying out Lost Admiral Returns!
Click here to to buy Lost Admiral Returns and get access all the new fun stuff!
Click here to download the trial version of Lost Admiral Returns.
© 2002-2005 Fogstone Games. All rights reserved. Click here for Terms and Conditions
Lost Admiral, Conquered Kingdoms, Grandest Fleet, and Fogstone are trademarks of Fogstone Games.